Introduction Of HTML : HTML is the standard of Hyper Markup Language for producing web pages.
What is HTML?
TML is a markup language that specifies the structure of your content. HTML is made up of a collection of elements that you can employ to surround, or wrap, various parts of your material to make it appear or operate in a specific way. The enclosing tags can hyperlink a word or image, italicize words, change the font size, and so on. For instance, consider the following line of content:
This is Simple Text Of HTML
We could include the line in paragraph tags to indicate that it is a paragraph if we wanted it to stand alone:
We could include the line in paragraph tags to indicate that it is a paragraph if we wanted it to stand alone:
An HTML element's anatomy
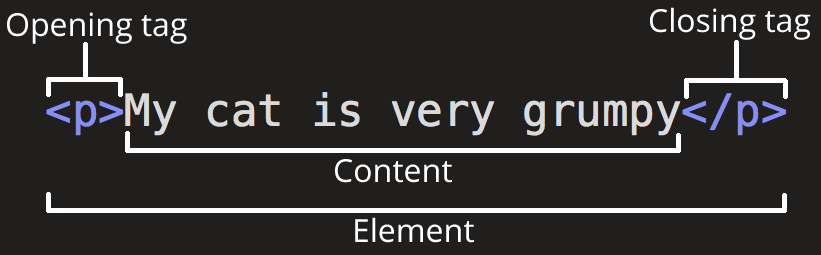
Let’s take a closer look at this paragraph element.
Our element’s primary components are as follows:
- The Opening Tag (<>) : The element’s name (in this case, p) is enclosed in opening and closing angle brackets. This indicates the beginning of the element or the point at which it becomes effective, in this case the beginning of the paragraph.
- The Closing Tag(</ >) : A forward slash appears before the element name in the closing tag, which is identical to the opening tag. This indicates the end of the element, in this case the end of the paragraph. One of the common novice mistakes is not adding a closing tag, which can have odd consequences.
- The content : This is the element’s content, which is merely text in this instance.
- The element is made up of the content, the opening tag, and the closing tag.
Additionally, elements may possess characteristics that resemble the following:
Additional information about the element that you do not wish to be included in the actual content is contained in its attributes. In this case, editor-note is the attribute value and class is the attribute name. You can target the element (and any other elements with the same class value) with style information and other things by using the class property, which gives the element a non-unique identifier. Some qualities, like necessary, are worthless.
A value-setting attribute always has:
- The element name (or the preceding attribute, if the element already has one or more attributes) should be separated by a space.
- An equal sign is displayed after the attribute name.
- The beginning and ending quote marks enclose the attribute value.
Note: You can leave simple attribute values unquoted if they don’t contain ASCII whitespace or any of the letters “ ‘ ` = < > , “ but it’s best to quote all attribute values because it makes the code more readable and consistent.
Nesting elements
Nesting is the process of placing items inside other elements. The word “very” might be wrapped with a < strong >
element to indicate that it should be highly emphasized if we wanted to say that our cat is extremely grumpy:
Nonetheless, you must ensure that your pieces are correctly nested. Since we opened the < p > element first in the example above and then the < strong > element, we must close the < strong > element first and then the < p > element. The following is not accurate:
For the elements to be obviously within or outside of one another, they must open and close properly. Your web browser will attempt to assume what you were trying to say if they overlap, as seen above, which may have unanticipated consequences. Don’t do that, then!
Void elements
Void elements are those that don’t contain any content. We already have the ![]() element on our HTML page.
element on our HTML page.
This has two attributes, but neither inner content nor a closing </img> tag are present. This is due to the fact that an image element does not encapsulate or modify information. Its goal is to embed the image where it appears on the HTML page.
An HTML document's anatomy
That finishes up the foundations of individual HTML elements, although they aren’t handy on their own. We’ll now examine how separate components come together to create a complete HTML page. Let’s go over the code we used in our index.html example again, which we initially saw in the article on dealing with files:
We have the following here:
- Doctype is <!doctype html> — doctype : This preface is necessary. When HTML was still in its infancy (about 1991/92), doctypes were intended to serve as links to a set of guidelines that an HTML page had to adhere to in order to be deemed proper HTML. These guidelines may include automatic error checking and other helpful features. These days, though, they are really only necessary to ensure that your document functions properly and don’t accomplish much else. For now, that’s all you need to know.
- The <html> element is <html></html> : This element, commonly referred to as the root element, encapsulates all of the material on the page. Additionally, it contains the lang attribute, which sets the document’s preferred language.
- The <head> element is <head></head> : This element serves as a container for everything you wish to put on the HTML page that isn’t the content that visitors are seeing. This includes character set declarations, CSS to design our material, keywords and a page description that you want to show up in search results, and more.
- <meta charset=”utf-8″> The— The majority of characters from the great majority of written languages are included in UTF-8, which is the character set that this element sets your document to use. In essence, it is now capable of processing any text that you may place on it. Setting this can assist prevent some issues later on, and there is no reason not to do so.
- <meta name=”viewport” content=”width=device-width”> — By ensuring that the page renders at the viewport’s width, this viewport element stops mobile browsers from rendering pages that are wider than the viewport and subsequently reducing their size.
- The <title> element is <title></title> : This determines your page’s title, which is the one that shows in the tab of the browser where the page loads. Additionally, when you bookmark or favorite a page, it is used to describe it.
- The <body> element is <body></body> : This includes all of the content you wish to display to visitors to your page, including text, pictures, videos, games, playable music, and more.
Images
Now let’s focus once again on the ![]() element:
element:
As previously stated, it inserts a picture into our page in the exact location where it appears. The location to our image file is contained in the src (source) element, which is how it accomplishes this.
An alt (alternative) characteristic has also been added. You can include descriptive text in the alt attribute for viewers who are unable to see the image for any of the following reasons:
- They have vision impairments. Screen readers are frequently used by users who have severe visual impairments to read the alt text to them.
- The image is not displaying because of a problem. Try purposefully altering the route inside your src property to make it erroneous, for instance. The image should be replaced with something like this if you save and reload the page:
“Descriptive text” is the alt text keyword. The alt text you offer should give the viewer enough details to understand the meaning of the image. Our present “My test image” language is completely inadequate in this scenario. Our Firefox logo would be far better off as “The Firefox logo: a flaming fox surrounding the Earth.”
Now try to think of better alt text for your picture.
Note: Learn more about accessibility in our accessibility learning module and how to apply an alt property for photos in different contexts with An alt Decision Tree.
Marking up text
The key HTML components you’ll need to mark up the text are covered in this section.
Headings
You can designate specific sections of your content as headings or subheadings by using header elements. An HTML document can have subtitles, chapter titles, and the primary title, just like a book. There are six heading levels in HTML (< h1 > to < h6 >), however you’ll probably only use three or four at most:
Note: An HTML comment is anything that appears between <!– and –>. When rendering the code, the browser disregards comments. Put otherwise, they are only visible in the code and not on the page. You can include useful notes about your code or logic in HTML comments.
Now, try giving your HTML page a fitting title that appears directly above your ![]() element.
element.
Note: You’ll see that your level 1 heading has an implicit style. Heading components are designed for accessibility and other purposes, like SEO, therefore don’t use them to make text bold or larger. Make an effort to arrange your pages’ headings in a meaningful order, without hopping around.
Paragraphs
You will utilize <p> elements a lot while marking up standard text content because they are used to hold paragraphs of text, as previously explained:
Put your sample text in one or more paragraphs, just beneath your ![]() element. You should have it from What Will Your Website Look Like?
element. You should have it from What Will Your Website Look Like?
Lists
HTML contains specific components for lists, which make up a large portion of the content on the web. There are always at least two components to marking up lists. Ordered and unordered lists are the two most used list types:
- Unordered lists, like shopping lists, are used when the items’ order is irrelevant. These have a < ul > element wrapped around them.
- Ordered lists are used for lists, like recipes, where the items’ order is important. An < ol > element encloses these.
An < li > (list item) element contains each item in the lists.
For instance, if we were to create a list out of the following paragraph fragment
This is how we could change the markup.
Try including a list on your example page, either ordered or unordered.
Links
Links are crucial since they are what give the internet its identity. The element <a> must be used in order to add a link, with “a” serving as the abbreviation for “anchor.” Use these procedures to turn text inside your paragraph into a link:
- Select a text. The “Mozilla Manifesto” was the text we selected.
- As seen below, enclose the text in a element:
3. As seen below, add a href attribute to the <a> element:
4. Enter the web address you would like the link to point to in this attribute’s value:
If you remove the https:// or http:// portion at the start of the site URL, which is known as the protocol, you may obtain unexpected results. Once a link has been created, click it to confirm that it is taking you to the desired location.
Note: At first glance, href may seem like a somewhat weird option for an attribute name. It stands for hypertext reference, so keep that in mind if you are having problems remembering it.
If you haven’t done so before, include a link on your page right now.
Conclusion
You should have a page similar to the one below (you can see it here) if you have followed all the directions in this article:
You may always compare your work with our completed example code on GitHub if you run into trouble.
We’ve barely touched the surface of HTML here. Visit our Learning HTML topic to learn more.